Snowflake
Snowflake is a enterprise grade data warehouse platform that provides a secure, scalable, and cost-effective way to store and analyze large volumes of data. It is fully compatible with the Akave O3 decentralized storage endpoint.
Below is a short video demo for using Akave O3 with Snowflake:
Prerequisites
- A Snowflake account with proper permissions
- Snowflake has all akave.xyz endpoints enabled by default starting in the 9.10 release
- For most of these queries
SYSADMINis the highest level of permissions required, however for Iceberg compatibilityACCOUNTADMINis required
- Akave Cloud Credentials
- If you do not already have these, please reach out to us for access to Akave Cloud
- AWS CLI
- Install the AWS CLI using the instructions for your operating system
- Once successfully installed use the
aws configurecommand to set your Akave credentials:- access_key: Provided by Akave
- secret_key: Provided by Akave
- region: akave-network
Note: All commands pointing to Akave should use one of the custom endpoints listed in the Akave Environment documentation.
Setup Guide
O3 API
The following section is a quick start guide to using Akave with the AWS CLI for basic Snowflake setup requirements. For more information and usage instructions on using Akave O3, refer to the Akave O3 documentation.
1. Test that your credentials are valid
Ensure your credentials are valid by listing buckets in your account:
aws s3api list-buckets \
  --endpoint-url https://o3-rc2.akave.xyz
Expected output:
The output should include an empty buckets array if you haven’t created any buckets in Akave yet:
{
    "Buckets": [],
    "Owner": {
        "DisplayName": "ServiceAccount-123...xyz",
        "ID": "abc...789"
    },
    "Prefix": ""
}
2. Create a bucket
Then, create a bucket using the AWS CLI and your Akave credentials:
aws s3 mb s3://my-snowflake-bucket \
  --endpoint-url https://o3-rc2.akave.xyz
Expected output:
make_bucket: my-snowflake-bucket3. Test uploading an object
Finally, test uploading an object to your bucket:
aws s3 cp ./myfile.txt s3://my-snowflake-bucket/myfile.txt \
  --endpoint-url https://o3-rc2.akave.xyz
Expected output:
upload: ./myfile.txt to s3://my-snowflake-bucket/myfile.txtSnowflake Configuration
1. Create a stage in Snowflake
Start by creating a stage in your account by running the below command for the bucket you created in the last section:
CREATE STAGE my_akave_stage
  URL = 's3compat://my-snowflake-bucket/'
  ENDPOINT = 'o3-rc2.akave.xyz'
  CREDENTIALS = (AWS_KEY_ID = '1a2b3c...' AWS_SECRET_KEY = '4x5y6z...')
  DIRECTORY = ( ENABLE = true );
Expected output:
Stage area MY_AKAVE_STAGE successfully created.2. Copy data from Snowflake into Akave
COPY INTO @my_akave_stage/nation_data/
FROM SNOWFLAKE_SAMPLE_DATA.TPCH_SF1.NATION
FILE_FORMAT = (
  TYPE = CSV
  COMPRESSION = GZIP
  FIELD_OPTIONALLY_ENCLOSED_BY = '"'
);
For this example we use TPCH_SF1.NATION from the SNOWFLAKE_SAMPLE_DATA database, a 4KB table with only 25 rows and 4 columns.
Expected output:

3. Define a CSV file format
CREATE OR REPLACE FILE FORMAT my_csv_format
  TYPE = CSV
  COMPRESSION = GZIP
  FIELD_OPTIONALLY_ENCLOSED_BY = '"'
  SKIP_HEADER = 0;
Expected output:
File format MY_CSV_FORMAT successfully created.4. Create an external table in Akave
CREATE OR REPLACE EXTERNAL TABLE ext_akave_table (
  N_NATIONKEY NUMBER AS (VALUE:c1::NUMBER),
  N_NAME STRING AS (VALUE:c2::STRING),
  N_REGIONKEY NUMBER AS (VALUE:c3::NUMBER),
  N_COMMENT STRING AS (VALUE:c4::STRING)
)
LOCATION = @my_akave_stage/nation_data/
FILE_FORMAT = my_csv_format
PATTERN = '.*\.csv\.gz'
AUTO_REFRESH = FALSE
REFRESH_ON_CREATE = TRUE;
AUTO_REFRESH must be set to false because this feature is not supported for S3 Compatible Storage on Snowflake and without being explicitly set the table will not be created
Expected Output:
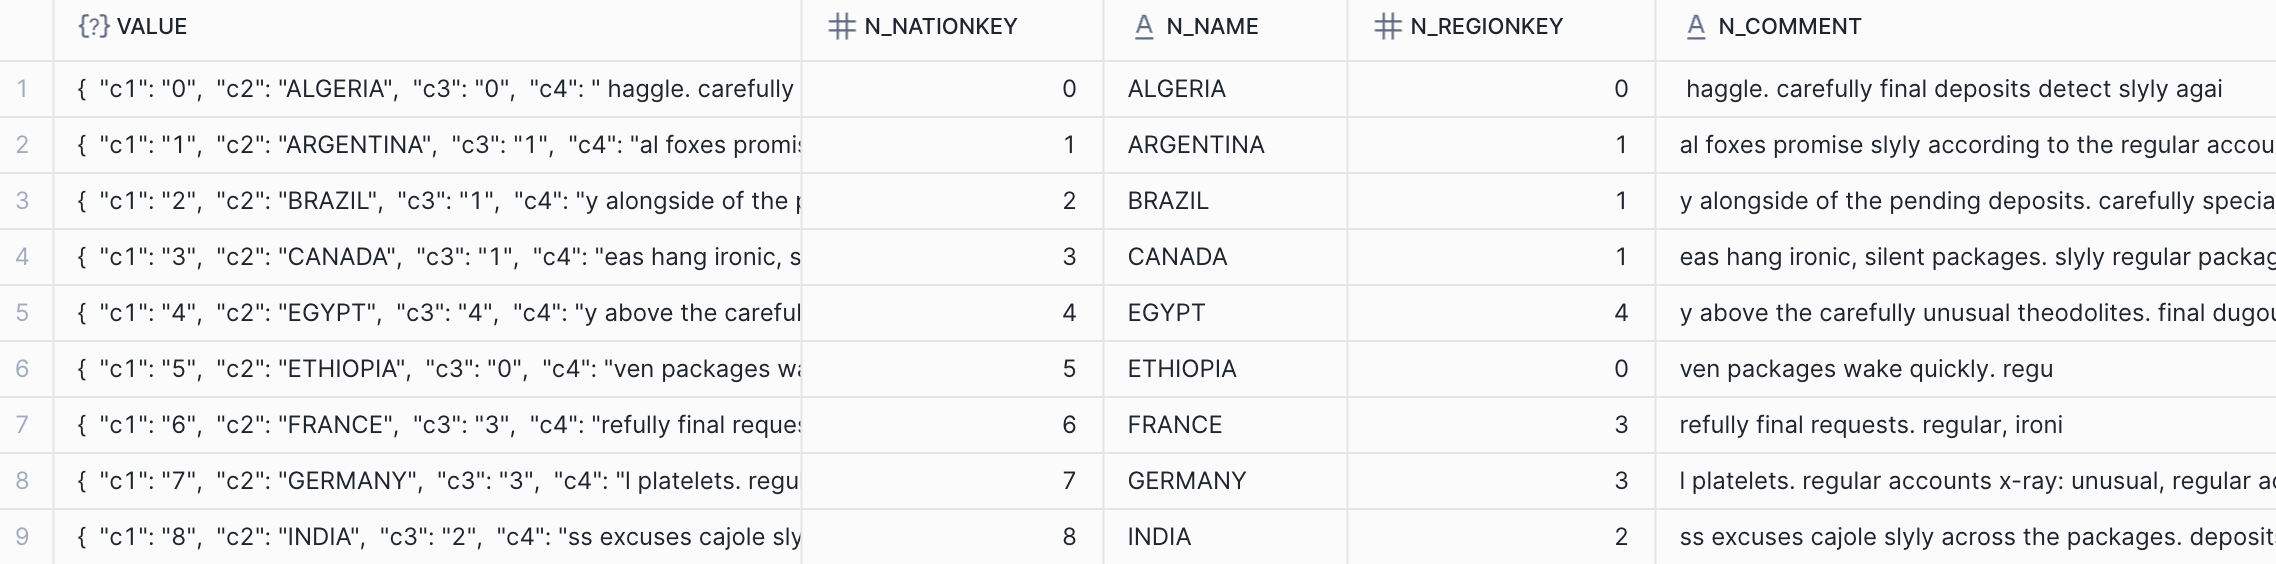
Table EXT_AKAVE_TABLE successfully created.5. Query data directly from Akave’s decentralized storage
SELECT * FROM ext_akave_table;Expected output:
6. Retrieve data stored in Akave from Snowflake
You can retrieve the data stored in Akave from Snowflake by synchronizing the raw data from your bucket/folder to a directory:
aws s3 sync s3://my-snowflake-bucket/nation_data ./local-directory \
  --endpoint-url https://o3-rc2.akave.xyz
Expected output:
download: s3://my-snowflake-bucket/nation_data/data_0_0_0.csv.gz to local-directory/data_0_0_0.csv.gzIceberg Configuration
Iceberg is a columnar storage format that is compatible with S3 and can be used with Snowflake to store and query data. To use Iceberg with Snowflake on external storage you will need to use an external volume which requires ACCOUNTADMIN permissions.
1. Create a Volume in Snowflake
Start by creating an external volume in your Snowflake account by running the below command for the bucket you created in the O3 API section:
CREATE OR REPLACE EXTERNAL VOLUME akaveO3extvol
STORAGE_LOCATIONS = (
(
NAME = 'akave_storage_location'
STORAGE_PROVIDER = 'S3COMPAT'
STORAGE_BASE_URL = 's3compat://my-snowflake-bucket/'
CREDENTIALS = (
AWS_KEY_ID = 'ABC'
AWS_SECRET_KEY = 'xyz'
)
STORAGE_ENDPOINT = 'o3-rc2.akave.xyz'
)
);
Expected Output:
AKAVEO3EXTVOL successfully created.2. Create an Iceberg Table
CREATE OR REPLACE ICEBERG TABLE AKAVE_ICEBERG
(
 A VARCHAR(134217728),
 B FLOAT,
 C NUMBER(38,0)
)
CATALOG = 'SNOWFLAKE'
EXTERNAL_VOLUME = 'akaveO3extvol'
BASE_LOCATION = 'my_iceberg_table_data';
Expected Output:
Table AKAVE_ICEBERG successfully created.Note: BASE_LOCATION can be set to anything you want data to be prefixed with in your Akave bucket. This creates a prefix/directory in S3 with a hash after like below:
  aws s3 ls s3://my-snowflake-bucket --profile akave-o3
	PRE my_iceberg_table_data.yZNuGJ87/
3. Load data into the Iceberg table
INSERT INTO AKAVE_ICEBERG (A, B, C)
SELECT N_NAME, N_REGIONKEY, N_NATIONKEY
FROM SNOWFLAKE_SAMPLE_DATA.TPCH_SF1.NATION;
For this example we use TPCH_SF1.NATION from the SNOWFLAKE_SAMPLE_DATA database, a 4KB table with only 25 rows and 4 columns.
Expected output:

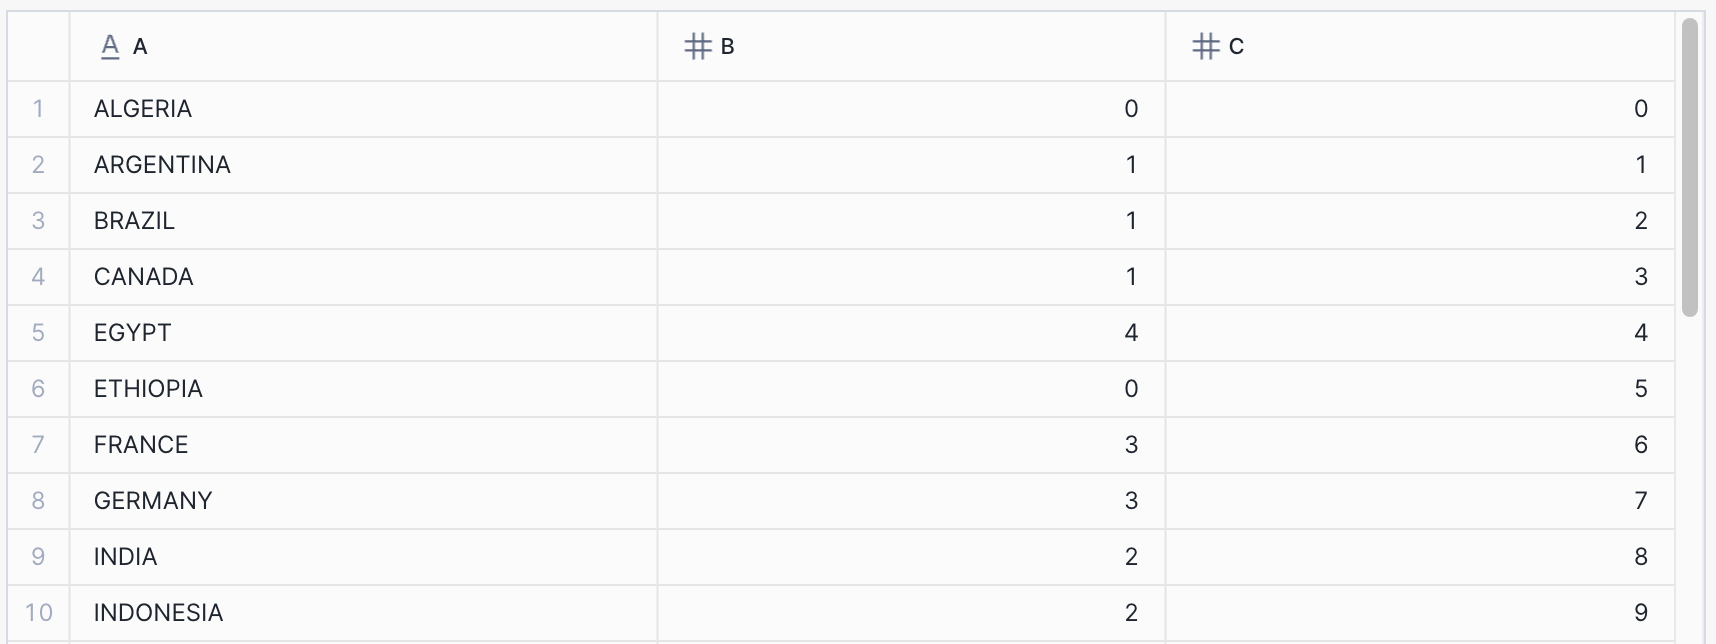
4. Query data from the Iceberg table
SELECT * FROM AKAVE_ICEBERG;Expected output:
5. Retrieve data stored in Akave from Snowflake
aws s3 sync s3://my-snowflake-bucket/my_iceberg_table_data ./local-directory \
  --endpoint-url https://o3-rc2.akave.xyz
Expected output:
download: s3://my-snowflake-bucket/my_iceberg_table_data.UxEro55R/data/72/snow_CLSW4FMgWLc_QG9-VOmtbhg_0_1_002.parquet to local-directory/data/72/snow_CLSW4FMgWLc_QG9-VOmtbhg_0_1_002.parquet
download: s3://my-snowflake-bucket/my_iceberg_table_data.UxEro55R/metadata/00001-42c971ee-ba5c-4c27-a88c-92500bf1547a.metadata.json to local-directory/metadata/00001-42c971ee-ba5c-4c27-a88c-92500bf1547a.metadata.json
download: s3://my-snowflake-bucket/my_iceberg_table_data.UxEro55R/metadata/1760535841784000000-SghOCoESn4x2NpZ6ai8GUw.avro to local-directory/metadata/1760535841784000000-SghOCoESn4x2NpZ6ai8GUw.avro
Note that your data and metadata downloads will look different depending on the data you inserted into the Iceberg table
Links to Additional Resources
Below are some additional resources from Snowflake, AWS, and Akave that may be helpful:
- Snowflake
- Akave
- AWS