Akavelink API
Welcome to the Akave Link API! This API wrapper enables seamless integration with Akave’s decentralized storage network. Below, you’ll find quick setup steps, examples of how to use each API endpoint with JavaScript, and equivalent curl commands.
- GitHub repo for reference: https://github.com/akave-ai/akavelink
- Installing Docker: https://docs.docker.com/engine/install/
Getting Started
Step 1: Pull the Docker Image
To start, pull the Akave Link Docker image:
docker pull akave/akavelink:latestStep 2: Get a Wallet Address and Request Funds
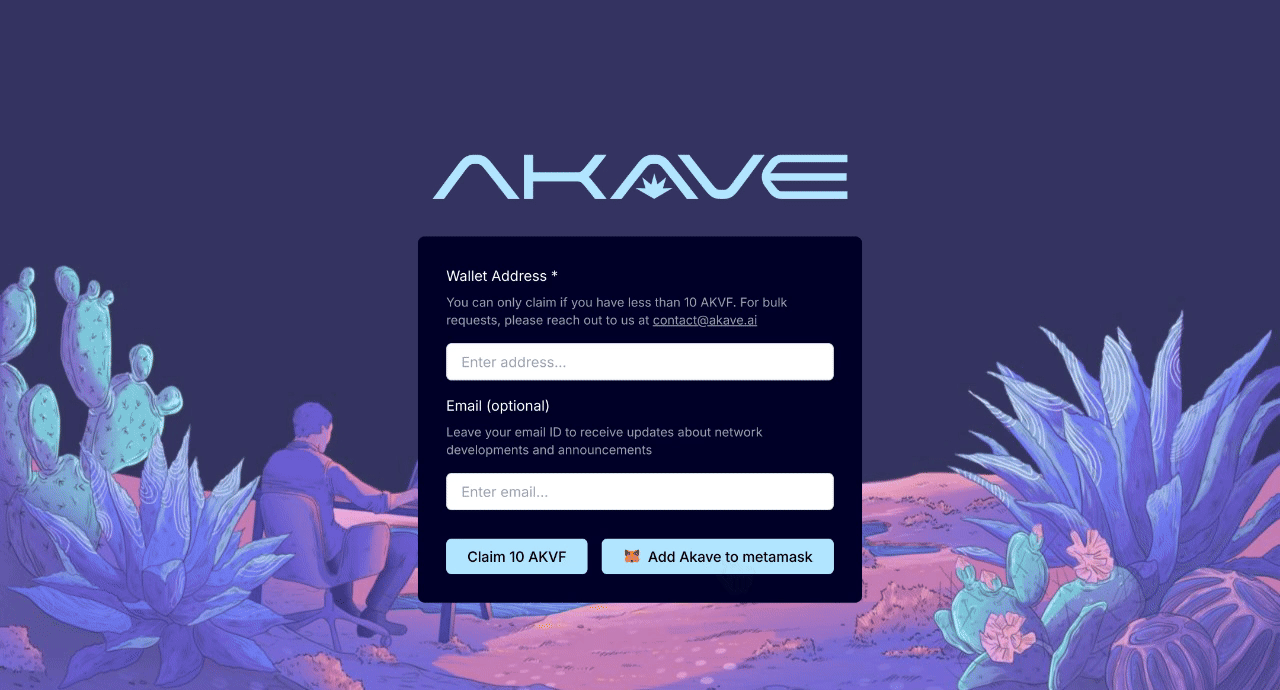
- Visit https://faucet.akave.ai to obtain a wallet address and add the Akave chain to MetaMask.
- Request funds from the faucet to start experimenting with the Akave Link API.
Blockchain Explorer: http://explorer.akave.ai
Step 3: Run the Akave Link Container
Run the container and specify the PRIVATE_KEY environment variable and the NODE_ADDRESS public endpoint.
The Node Address (NODE_ADDRESS) is ➔ connect.akave.ai:5500
The private key is the private key of an EVM wallet address. For steps on how to access this private key see this example using Metamask.
Always be careful when dealing with your private key. Double-check that you’re hard-coding it anywhere and not committing it to Git.
Remember: Anyone with access to your private key has complete control over your funds.
Ensure you’re not reusing a private key that’s been deployed on other EVM chains. Each blockchain has its own attack vectors, and reusing keys across chains exposes you to cross-chain vulnerabilities. Keep separate keys to maintain isolation and protect your assets.
Run the Akave Link Docker Container
docker run -d \
  -p 8000:3000 \
  -e NODE_ADDRESS="public_node_address" \
  -e PRIVATE_KEY="your_private_key" \
  akave/akavelink:latest
The API will now be running locally at http://localhost:8000.
Setting Up the JavaScript Wrapper
Here’s a quick setup to interact with the Akave API using JavaScript:
const axios = require('axios');

const API_BASE_URL = 'http://localhost:8000';

async function apiRequest(method, endpoint, data = null) {
  try {
    const response = await axios({
      method,
      url: `${API_BASE_URL}${endpoint}`,
      data,
    });
    console.log(response.data);
  } catch (error) {
    console.error(error.response ? error.response.data : error.message);
  }
}
Example Usage
Each section below demonstrates API calls using this wrapper, alongside the curl equivalent.
Bucket Operations
1. Create a Bucket
Create a new storage bucket.
JavaScript Example:
apiRequest('POST', '/buckets', { bucketName: 'myBucket' });curl Command:
curl -X POST http://localhost:8000/buckets -H "Content-Type: application/json" -d '{"bucketName": "myBucket"}'2. List Buckets
Retrieve all existing buckets.
JavaScript Example:
apiRequest('GET', '/buckets');curl Command:
curl -X GET http://localhost:8000/buckets3. View Bucket Details
Retrieve details of a specific bucket.
JavaScript Example:
apiRequest('GET', '/buckets/myBucket');curl Command:
curl -X GET http://localhost:8000/buckets/myBucket4. Delete a Bucket
Delete a specific bucket.
JavaScript Example:
apiRequest('DELETE', '/buckets/myBucket');curl Command:
curl -X DELETE http://localhost:8000/buckets/myBucketFile Operations
1. List Files in a Bucket
Retrieve a list of files within a bucket.
JavaScript Example:
apiRequest('GET', '/buckets/myBucket/files');curl Command:
curl -X GET http://localhost:8000/buckets/myBucket/files2. Get File Info
Fetch metadata about a specific file.
JavaScript Example:
apiRequest('GET', '/buckets/myBucket/files/myFile.txt');curl Command:
curl -X GET http://localhost:8000/buckets/myBucket/files/myFile.txt3. Upload a File
Upload a file to a bucket.
JavaScript Example (using FormData):
const FormData = require('form-data');
const fs = require('fs');

async function uploadFile(bucketName, filePath) {
  const form = new FormData();
  form.append('file', fs.createReadStream(filePath));

  try {
    const response = await axios.post(`${API_BASE_URL}/buckets/${bucketName}/files`, form, {
      headers: form.getHeaders(),
    });
    console.log(response.data);
  } catch (error) {
    console.error(error.response ? error.response.data : error.message);
  }
}

uploadFile('myBucket', './path/to/file.txt');
curl Command:
curl -X POST http://localhost:8000/buckets/myBucket/files -F file=@/path/to/file.txt4. Download a File
Download a file from a bucket.
JavaScript Example:
async function downloadFile(bucketName, fileName, outputDir) {
  const fs = require('fs');
  try {
    const response = await axios.get(`${API_BASE_URL}/buckets/${bucketName}/files/${fileName}/download`, {
      responseType: 'blob',
    });
    console.log(`File downloaded: ${fileName}`);
    fs.writeFileSync(`./${outputDir}/${fileName}`, response.data);
  } catch (error) {
    console.error(error.response ? error.response.data : error.message);
  }
}
You can download the file directly in your browser or provide a download URL with a publicly hosted API by using:
http(s)://ip-or-dns-name/buckets/:BucketName/files/:FileName/downloadcurl Command:
curl -X GET http://localhost:8000/buckets/myBucket/files/myFile.txt/download -o myFile.txtOutput file extension should be the same as the requested file.
Error Handling
All endpoints return errors in the following format:
{
    "success": false,
    "error": "error message"
}
Ensure you handle these responses in your code to capture and process errors effectively.