Databricks
Databricks is a unified analytics platform that enables data engineering, data science, and machine learning workflows. Integrate Akave storage with Databricks to leverage decentralized storage for your data lakehouse architecture.
Prerequisites
- Databricks Workspace
- If you do not already have a Databricks workspace, please create one at Databricks
- Akave Cloud Credentials
- If you do not already have these, please create them on Akave Cloud
- Databricks CLI (recommended for secrets management)
Setup Guide
To get started with Akave and Databricks, make sure you have access to your Akave:
- Access Key ID
- Secret Access Key
- Endpoint URL
As well as a bucket in Akave to store your data. More information on how to create a bucket can be found in the Bucket Management section of these docs.
Databricks Cluster Configuration
This guide demonstrates how to configure Databricks to use Akave O3 storage at the cluster level, which applies the configuration to all notebooks running on that cluster.
1. Access your Databricks workspace
Start by logging into your Databricks workspace. Visit Databricks and sign in with your credentials.
2. Create or edit compute resources
In the left sidebar, click on Compute to view your clusters.
You can either create a new cluster or edit an existing one:
- To create a new cluster, click Create Cluster
- To edit an existing cluster, click on the cluster name, then click Edit

3. Configure Spark settings
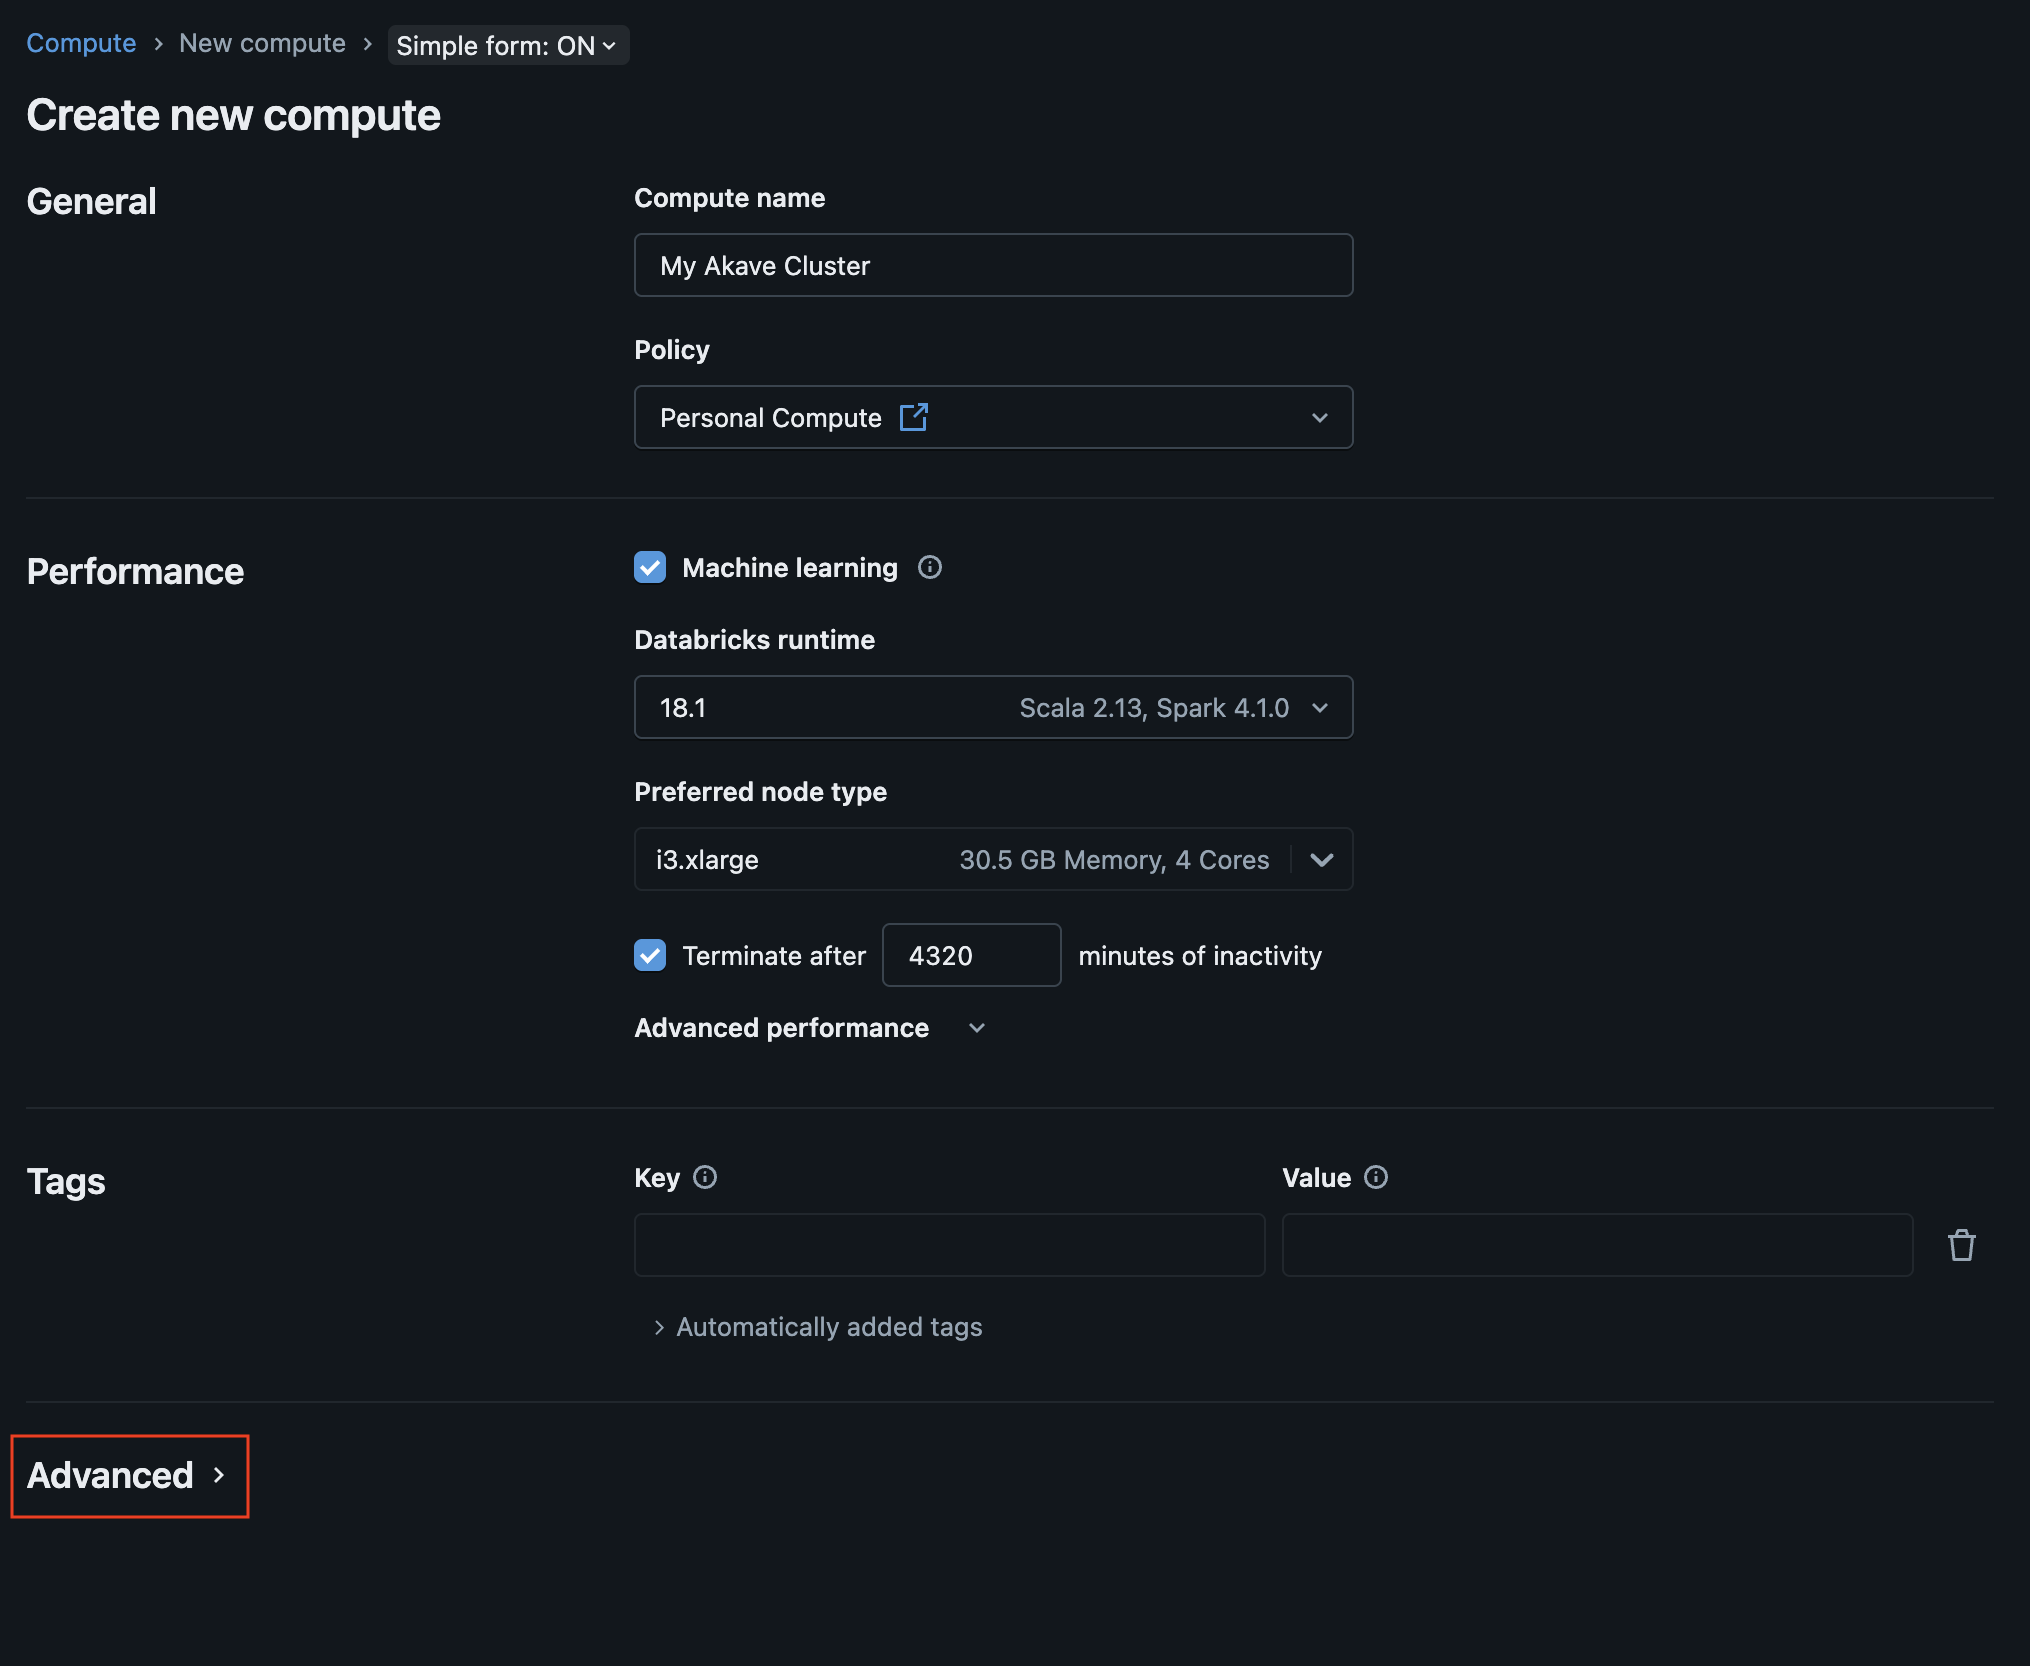
Compute name: Enter a name for your cluster (e.g., “Akave O3 Cluster”).
Policy: Select the appropriate policy for your cluster (for more information on default policies, see the Databricks documentation).
Performance: Modify the performance settings for your cluster as needed.
Tags: Add any relevant tags to your cluster.
Once you have configured the basic settings, scroll down to the Advanced options section and click to expand it.
Then select the Spark tab.
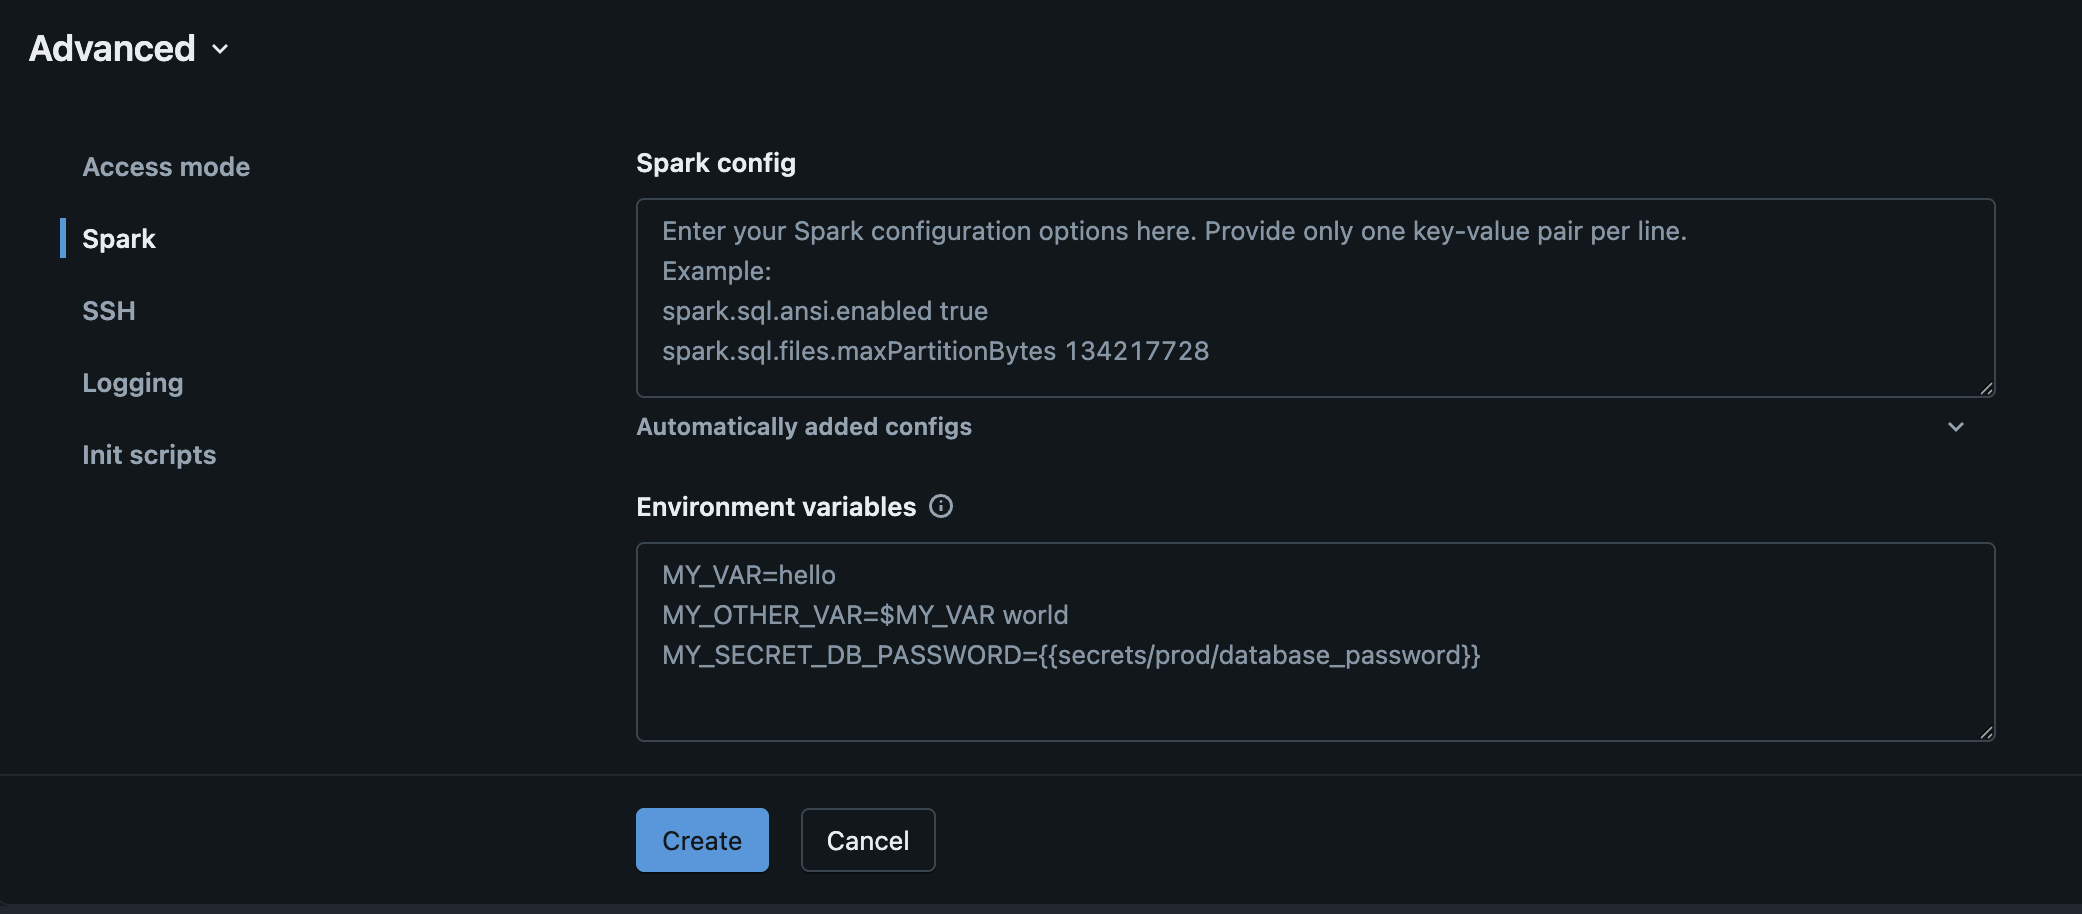
In the Spark config text box, add the following configuration properties:
spark.hadoop.fs.s3a.endpoint <your-endpoint-url>
spark.hadoop.fs.s3a.access.key {{secrets/akave/access_key}}
spark.hadoop.fs.s3a.secret.key {{secrets/akave/secret_key}}

spark.hadoop.fs.s3a.impl org.apache.hadoop.fs.s3a.S3AFileSystem
spark.hadoop.fs.s3a.connection.ssl.enabled true
spark.hadoop.fs.s3a.path.style.access true

spark.hadoop.fs.s3a.connection.timeout 50000
spark.hadoop.fs.s3a.connection.establish.timeout 30000
spark.hadoop.fs.s3a.connection.ttl 300000
spark.hadoop.fs.s3a.threads.keepalivetime 60
spark.hadoop.fs.s3a.multipart.purge.age 86400
spark.hadoop.fs.s3a.assumed.role.session.duration 1800
spark.hadoop.fs.s3a.retry.interval 250
spark.hadoop.fs.s3a.retry.throttle.interval 500- Replace
<your-endpoint-url>with your Akave endpoint which can be found in the Akave Environment section of these docs - Your Akave Access Key and Secret Key will be configured in the Using Databricks Secrets section below
- The values above are recommendations, the important aspect is that the Hadoop driver requires numeric values without strings (e.g.
86400as seconds instead of24hto represent 24 hours)
Click “Create” once you have added the Spark configuration values and your Akave endpoint.
4. Add Libraries
Once you have created your compute, navigate to the “Libraries” tab and select “Install new”

Then select “Maven” as the library source, and add the following Hadoop packages:
org.apache.hadoop:hadoop-aws:3.3.6org.apache.hadoop:hadoop-common:3.3.6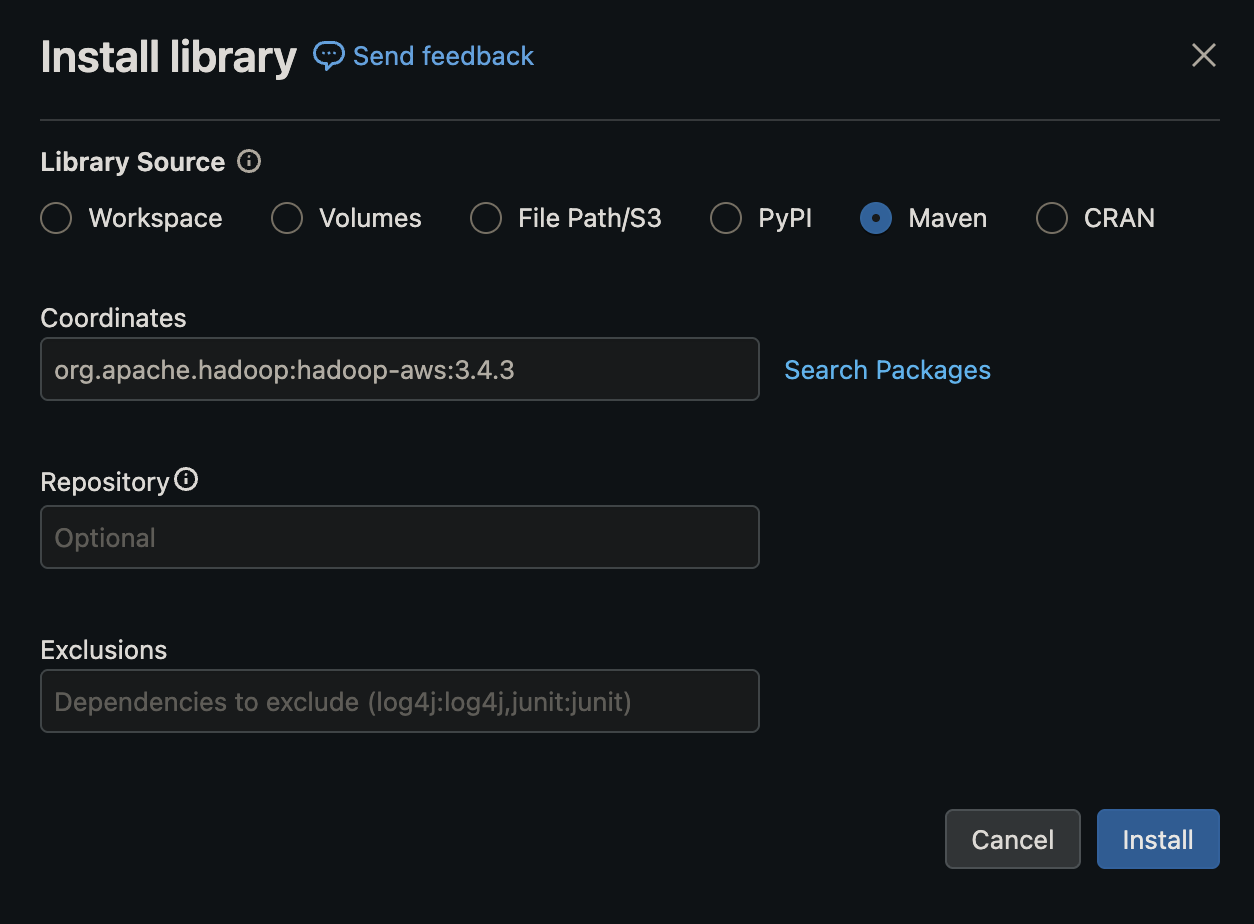
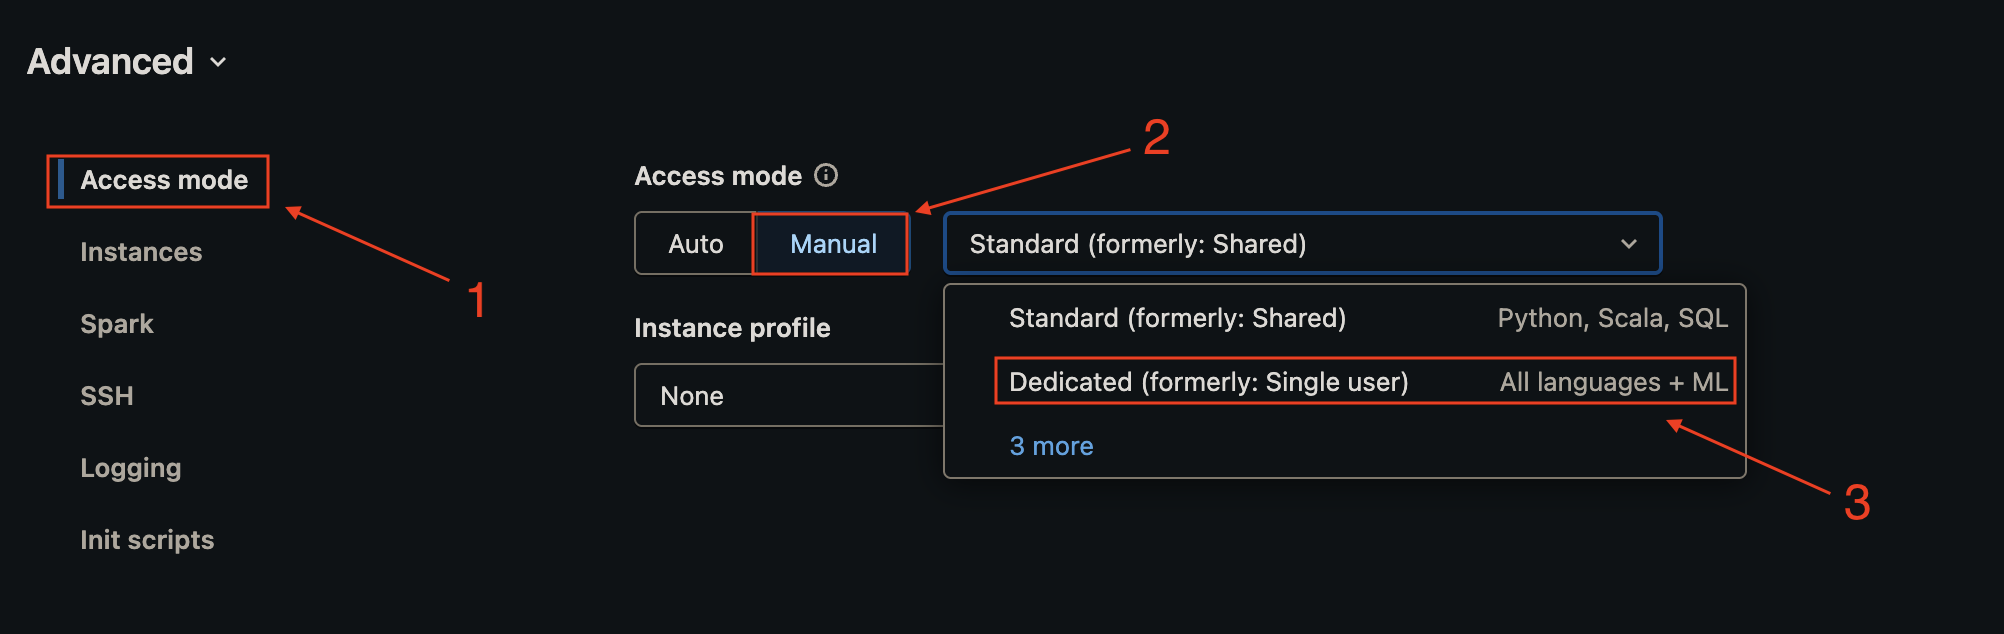
Note that if you are using the default “Shared” access mode you will first need to allowlist the Maven coordinates you’d like to add to the compute cluster. More information for how to do this can be found in the Databricks documentation on allowlist.
This is not required if you are running in the dedicated access mode, which you can configure for your cluster under Advanced -> Access Mode
5. Using Databricks Secrets
Store your Akave credentials securely using Databricks secrets instead of hardcoding them in the cluster configuration.
For more information on Databricks secrets see the Secret management section of their documentation.
1. Create a secret scope using the Databricks CLI:
databricks secrets create-scope akave2. Add your credentials to the secret scope:
databricks secrets put-secret akave access_key
databricks secrets put-secret akave secret_key
You’ll then be able to automatically reference secrets in your notebooks running in the selected workspace.
6. Save and start the cluster
Once you’ve finished configuring your instance and adding the necessary libraries, start the cluster if it’s not already running and wait for it to reach the Running state before proceeding.
 The green light indicates that the cluster is ready to use.
Testing the Connection
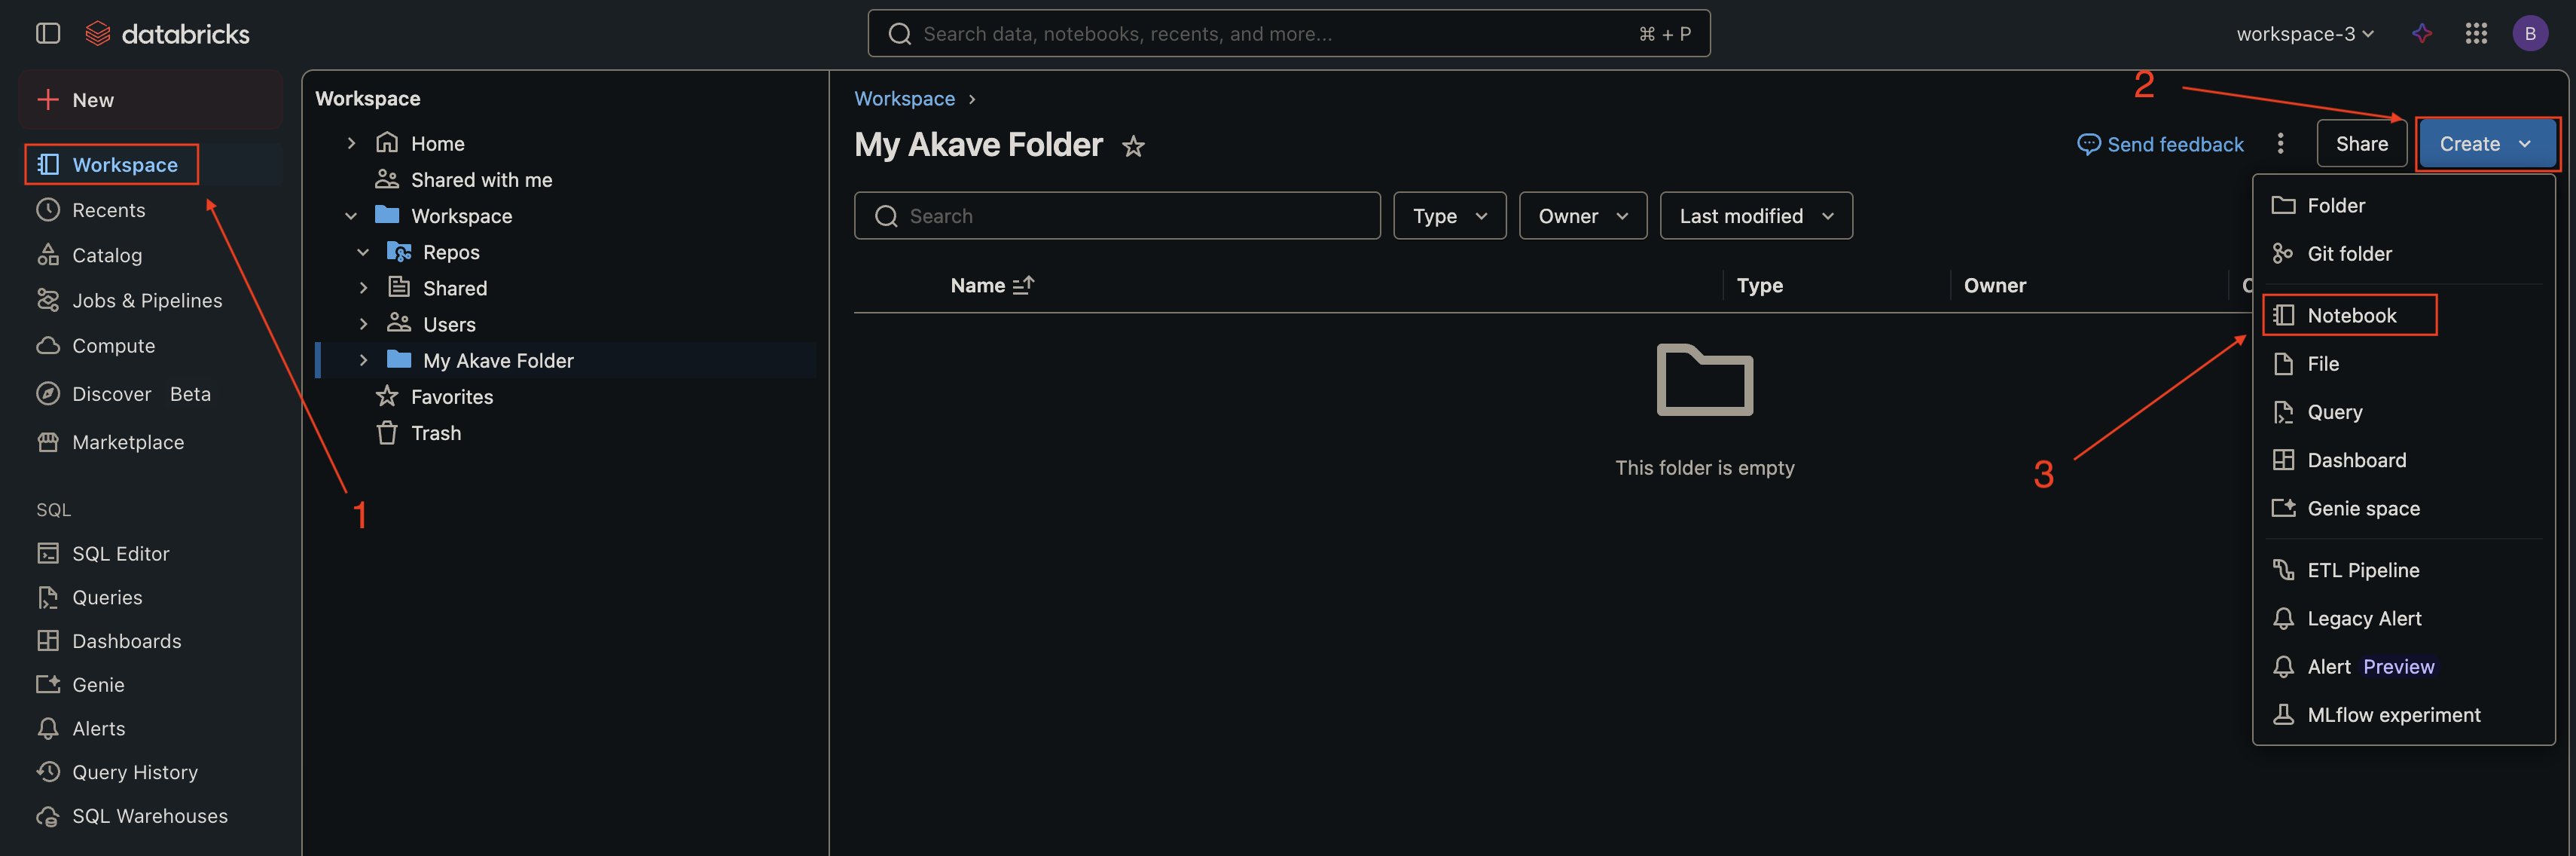
1. Create a new notebook
In the left sidebar, click Workspace, navigate to your desired folder, click the dropdown arrow, and select Create → Notebook.
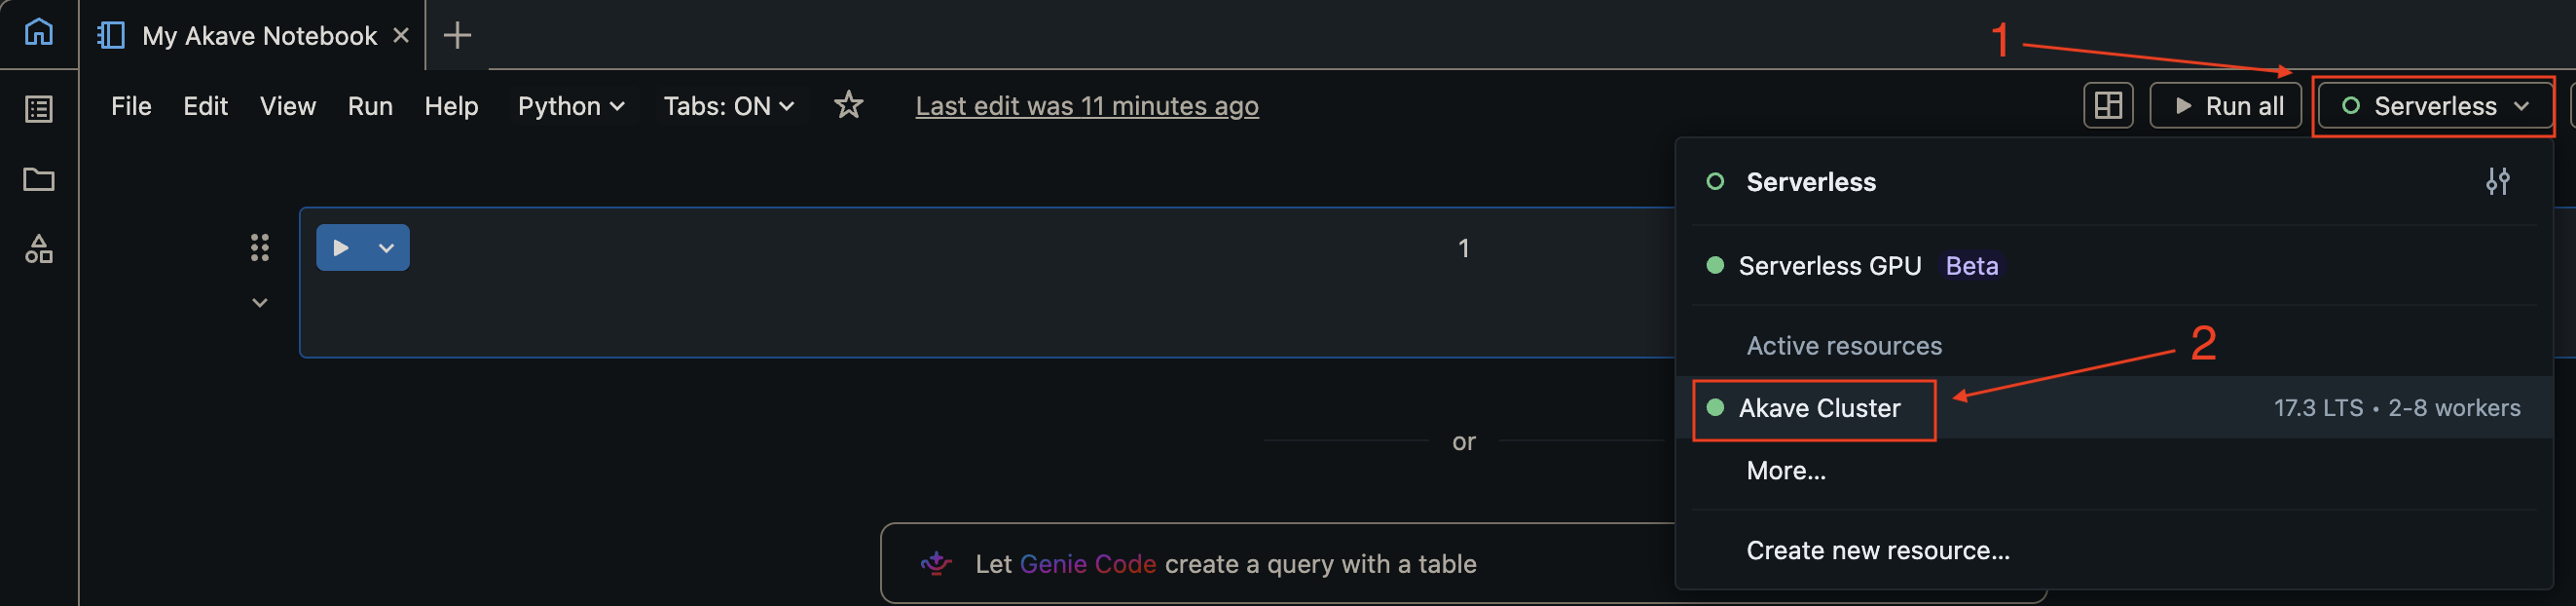
2. Attach the notebook to your cluster
In the notebook, use the cluster dropdown at the top to select the cluster you configured in the previous steps.
3. Test reading data from Akave
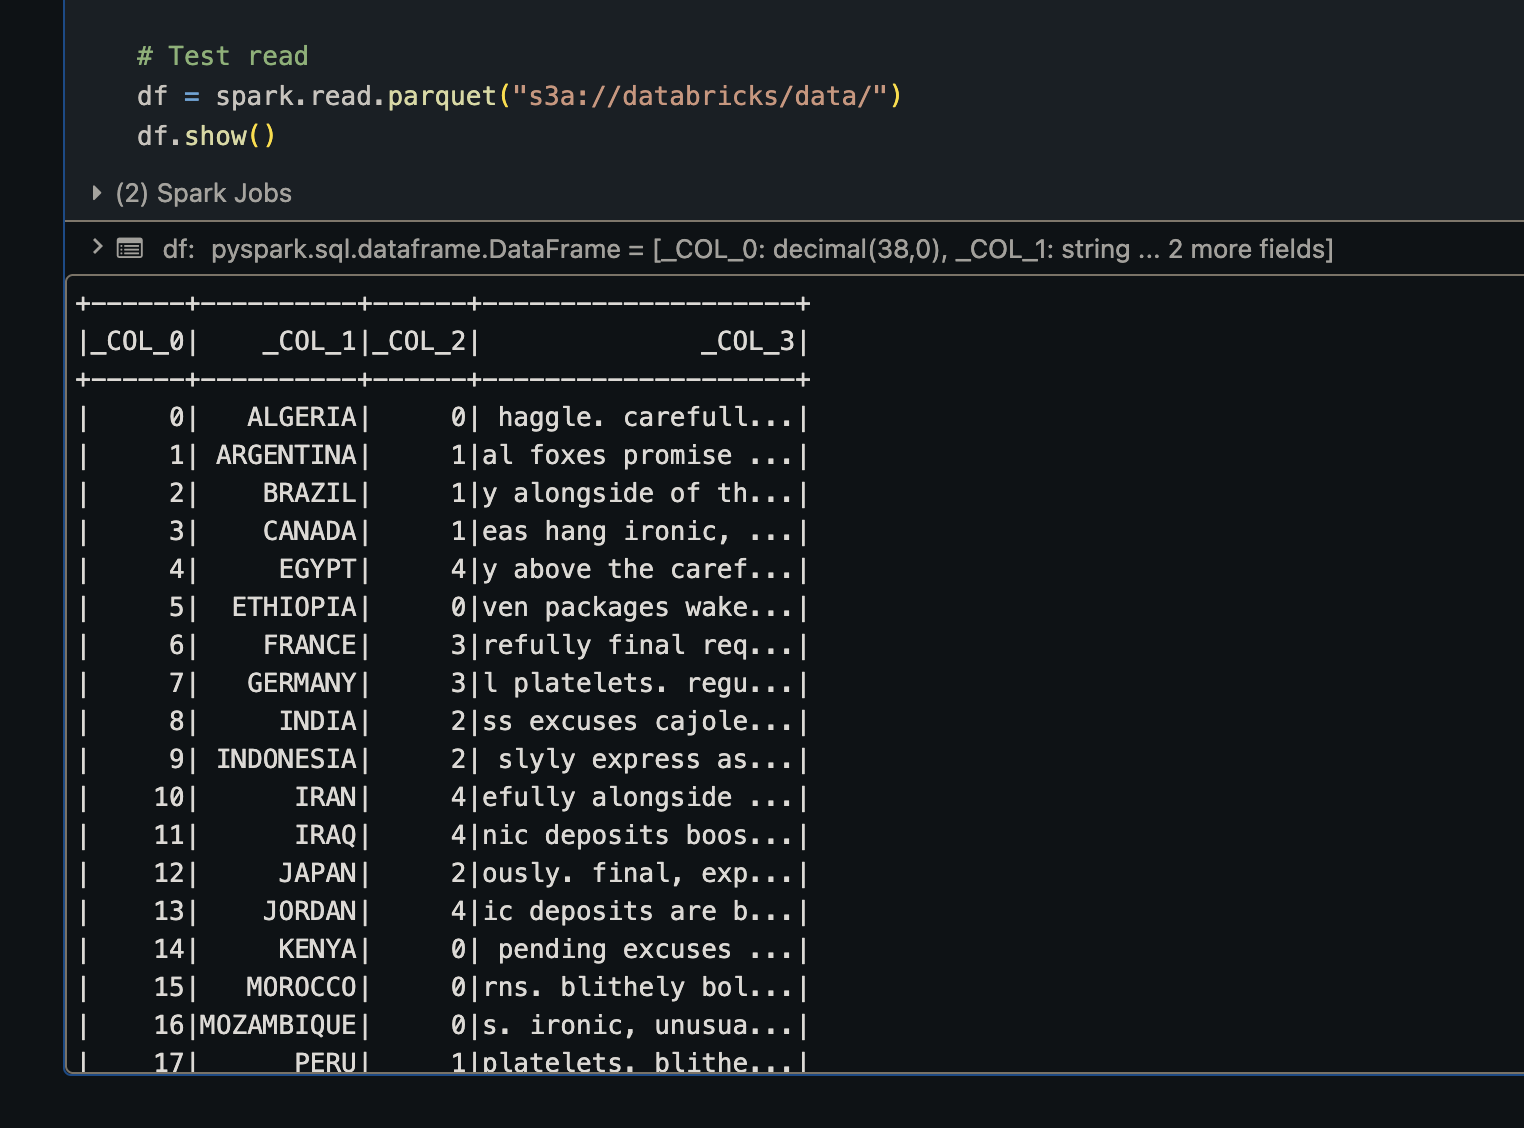
In a notebook cell, run the following command to test reading data from your Akave bucket:
df = spark.read.parquet("s3a://<your-bucket>/<your-path>/")
df.show()
Replace your-bucket with your Akave bucket name and your-path with the path to your data.
Expected output:
You should see the data from your Parquet file displayed in a table format.
Usage Examples
Reading Data from Akave
Read a CSV file:
df = spark.read.csv("s3a://bucket-name/path/to/file.csv", header=True, inferSchema=True)
df.show()
Read a Parquet file:
df = spark.read.parquet("s3a://bucket-name/path/to/file.parquet")
df.show()
Read JSON data:
df = spark.read.json("s3a://bucket-name/path/to/file.json")
df.show()
Read multiple Parquet files:
df = spark.read.parquet("s3a://bucket-name/path/to/data/*.parquet")
df.show()
Writing Data to Akave
Write DataFrame as Parquet:
df.write.mode("overwrite").parquet("s3a://bucket-name/path/to/output/")Write DataFrame as CSV:
df.write.mode("overwrite").csv("s3a://bucket-name/path/to/output/", header=True)Write DataFrame as Delta Table:
df.write.format("delta").mode("overwrite").save("s3a://bucket-name/path/to/delta-table/")Write with partitioning:
df.write.partitionBy("year", "month").parquet("s3a://bucket-name/partitioned-data/")Troubleshooting
Connection Issues:
- Verify your Akave O3 credentials are correct
- Ensure the endpoint URL is selected properly for your credentials
- Check that the cluster configuration includes all required Spark properties
- Restart the cluster after making configuration changes and ensure the cluster is in a “Running” state
File Not Found Errors:
- Verify the bucket name and file path are correct
- Ensure the bucket exists and contains data
- Check that your credentials have access to the specified bucket
Performance Issues:
- Use Parquet format for optimal performance with columnar data
- Implement data partitioning for large datasets
- Consider using Delta Lake format for ACID transactions and time travel capabilities
- Enable caching for frequently accessed data:
df.cache()